When Annika was born, Clark's aunt gave us a kids apron that her granddaughter had grown out of. It's very cute. In fact, I'm pretty sure I had one just like it when I was growing up.
I found this tutorial on Pinterest the other day, and thought that it would be a great idea to make the girls Christmas aprons. Since we only have the one little apron, there is a lot of fighting that goes on any time little helpers are in the kitchen.
Wal-Mart has Christmas potholders and tea towels on sale every year for $0.97 each. You can't get much cheaper than that! One tea towel makes two aprons, so you just have to buy two potholders. I also bought grosgrain ribbon from my local fabric store. It was $1.00/metre with 50% off. You could also buy the ribbon by the spool at Wal-Mart.
Step 1: Cut the tea towel in half.
Step 2: With right sides together, put your potholder in the middle of the tea towel. I cut the loop thingy off, since I didn't want it to be seen. Sew the potholder to the tea towel.
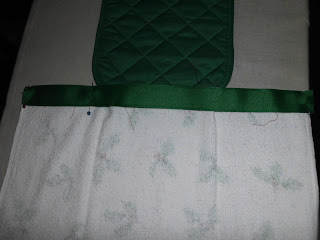
You'll see once you flip the potholder over, the towel has a nice finished edge to the top. This will help prevent fraying.
Step 3: I measured my ribbon and sewed the length of the tea towel on the BACK of the apron. This is to make sure that the cut edge of the towel is encased in the ribbon and won't fray.
You can see here that I sewed all around the ribbon: top, bottom and sides. I wanted to make sure that nothing would come apart.
You can tell here that my seams aren't very straight. No worries, since we're putting ribbon over top of the sewing.
Step 4: To keep my ribbon from fraying on the back and for the other parts that require ribbon, I used my lighter to melt the ends.
Step 5: Pin your ribbon that will be the belt on the top of the apron. I added 16 inches on either side to make the ties. Where did I get this measurement you ask? I measured the apron we already had. It still fits Annika, so I knew that there would be plenty of room. Once pinned, I sewed on the top and bottom.
Step 6: I cut 12 inches of ribbon for the neck ties. I attached them on both corners just by running my stitches forward and backward several times.
And there you have it, the finished product! I can't show pictures of a little girl wearing it until after Christmas, but I think it turned out really cute!


An easier way would be to go to Fabricland and buy a pre-printed apron pattern where you just cut and sew. Granted, they aren't kid sized but it's another easy way to do an apron. I did two John Deere ones like this, a pink and a green.
ReplyDeleteI beg to differ with you Jocelyn. The purpose is to save money, and two of these aprons cost me under $5.00. Also, they took me 1/2 hour to make, so I don't think your way would be easier! :)
DeleteGuess what I just finished making for 2 little girls for Christmas?!? :)
ReplyDeleteThose are beautiful - I know the girls will LOVE them! :)
ReplyDelete